FRAGUA — User Manual
Pura Belia · Fragua — a polyphonic chaos synthesizer: nine strange-attractor engines forge living, ever-evolving textures from deterministic chaos.
About this manual. It is hybrid: a Quick Start to get you playing fast, followed by a complete control-by-control reference. A Spanish edition mirrors it section for section.
Contents
- Welcome
- Installation & Activation
- Quick Start
- The Interface at a Glance
- The MAIN Page
- The Engines
- Modulators — LFO, VENV, Attractor
- The Modulation Matrix
- The MASTER Page
- FX
- Presets
- Settings — interface, voices, tuning, MIDI / MPE, license
- Appendix — Shortcuts & Credits
1. Welcome
Fragua is not a subtractive synth wearing a new coat. At its heart sit nine sound engines built on chaotic and strange-attractor systems — the same mathematics that describes turbulence, weather and coupled oscillators. Feed them a note and they don’t produce a static waveform; they evolve. Two notes are never quite identical, yet nothing is random: the chaos is deterministic, so a patch is repeatable, musical and yours to shape.
The name says it plainly. Fragua is Spanish for forge — the place where raw material is heated and hammered into form. That is the verb the whole instrument is built around: you take the raw output of a chaotic engine and forge it, through envelopes, filters, modulation and a full mastering chain, into a finished sound.
What makes Fragua different
- Three stackable lanes per note. Every key you press can sound up to three engines at once, each with its own complete voicing chain (oscillator, sub-oscillators, envelope, filter, EQ, output). Layer a tonal engine under a chaotic one; let one lane sustain while another fires a one-shot and fades away.
- Nine engines. Enjambre, Pozo, Hilo, Confluencia, Arena, Arco, Mitosis, Crisol and Telar — each a distinct flavour of chaos, from swarming particle clouds to a 2-D morphing wavetable weave.
- Deep, audio-rate modulation. Eight LFOs, four drawable vector envelopes (VENV), four attractor modulators and a full modulation matrix with macros, MIDI/MPE and per-note keytracking. Almost anything can modulate almost anything — including other modulators.
- A mastering chain inside the synth. A per-lane EQ on every engine, plus a master section with EQ, saturator, compressor, stereo width, limiter and metering — and three serial FX buses. Patches arrive finished.
- Built to be seen. Live scopes per lane, a 3-D spectrum on the master, modulation halos painted right on the faders, and detachable editor windows so you can pull any section out into its own floating panel.
How to read this manual
If you just want to make a sound, jump to the Quick Start. If you want to understand a specific control, the reference chapters (5 onward) walk the interface page by page, top to bottom, exactly as it is laid out on screen.
2. Installation & Activation
System requirements
- macOS 11 Big Sur or later — Apple Silicon and Intel (universal binary).
- Windows 10 or later (64-bit).
- A host that supports Audio Unit (AU) (macOS) or VST3 (macOS / Windows), or use the Standalone application.
- A modern multi-core CPU. 4 GB RAM minimum, 8 GB recommended.
Plug-in formats
Fragua installs in three formats:
| Format | macOS | Windows |
|---|---|---|
| Audio Unit (AU) | /Library/Audio/Plug-Ins/Components/Fragua.component | — |
| VST3 | /Library/Audio/Plug-Ins/VST3/Fragua.vst3 | C:\Program Files\Common Files\VST3\Fragua.vst3 |
| Standalone | /Applications/Fragua.app | Fragua.exe |
Installing
- Open the downloaded installer — a
.pkgon macOS, a.exeon Windows — and follow the steps. - Restart your DAW so it rescans plug-ins. In some hosts you may need to force a rescan in the plug-in manager.
- Load Fragua as an instrument on a MIDI/instrument track, or open the Standalone app to play without a host.
Activation
Fragua is licensed through Lemon Squeezy. Each license includes 3 activations, so you can run Fragua on your studio machine, your laptop and one spare.
- After purchase you receive a license key by email.
- Open Fragua and go to Settings → License (or use the activation overlay shown on first launch).
- Paste your key and click Activate. An internet connection is required for this one-time step.
Working offline. That activation is the only moment Fragua needs an internet connection. Fragua never phones home: there is no periodic re-validation, no background check, nothing running behind your back. Once activated, your license is stored on your computer and read from disk, so Fragua keeps working indefinitely on a machine that stays permanently offline. The only other action that touches the network is Deactivate, and only when you choose it. The 10-day trial is fully offline too.
Trial. Before activating you can run a 10-day trial with full functionality (you’ll see a brief reminder once per session). When the trial ends, activate to keep using Fragua.
Moving to another computer. Open Settings → License → Deactivate to free an activation, then activate Fragua on the new machine. You can move between computers as often as you like, as long as no more than 3 are active at once.
3. Quick Start
The fastest path from silence to sound.
- Load Fragua on an instrument track (or open the Standalone). You’ll land on the MAIN page with Lane 01 already running the Enjambre engine.
- Play a note. Enjambre’s swarming texture should respond to the keyboard straight away.
- Browse presets. Click the preset name in the top bar (it reads Default) to open the browser, or use the ‹ › arrows to step through. Pick something and keep playing.
- Shape the sound. Back on MAIN, try the lane’s FILTER Cut and the ENV GEN faders (Att / Dec / Sus / Rel). These are the two fastest ways to change a patch’s character.
- Add a second engine. Find Lane 02, click its ENGINE dropdown (it reads None) and choose, say, Pozo. You now have two engines stacked on every note.
- Add movement. Go to MODULATORS, set an LFO, then open the MATRIX and route that LFO to a destination — for example a lane’s filter cutoff. (Full walkthrough in §8.)
- Finish it. Visit the MASTER page to glue everything with the EQ, compressor and limiter, and FX to add reverb or delay on a send bus.
Tip — start from presets. Fragua’s engines are deep; the factory presets are the quickest way to learn what each one can do. Open a preset, then look at which lanes, modulators and matrix routings it uses.
4. The Interface at a Glance
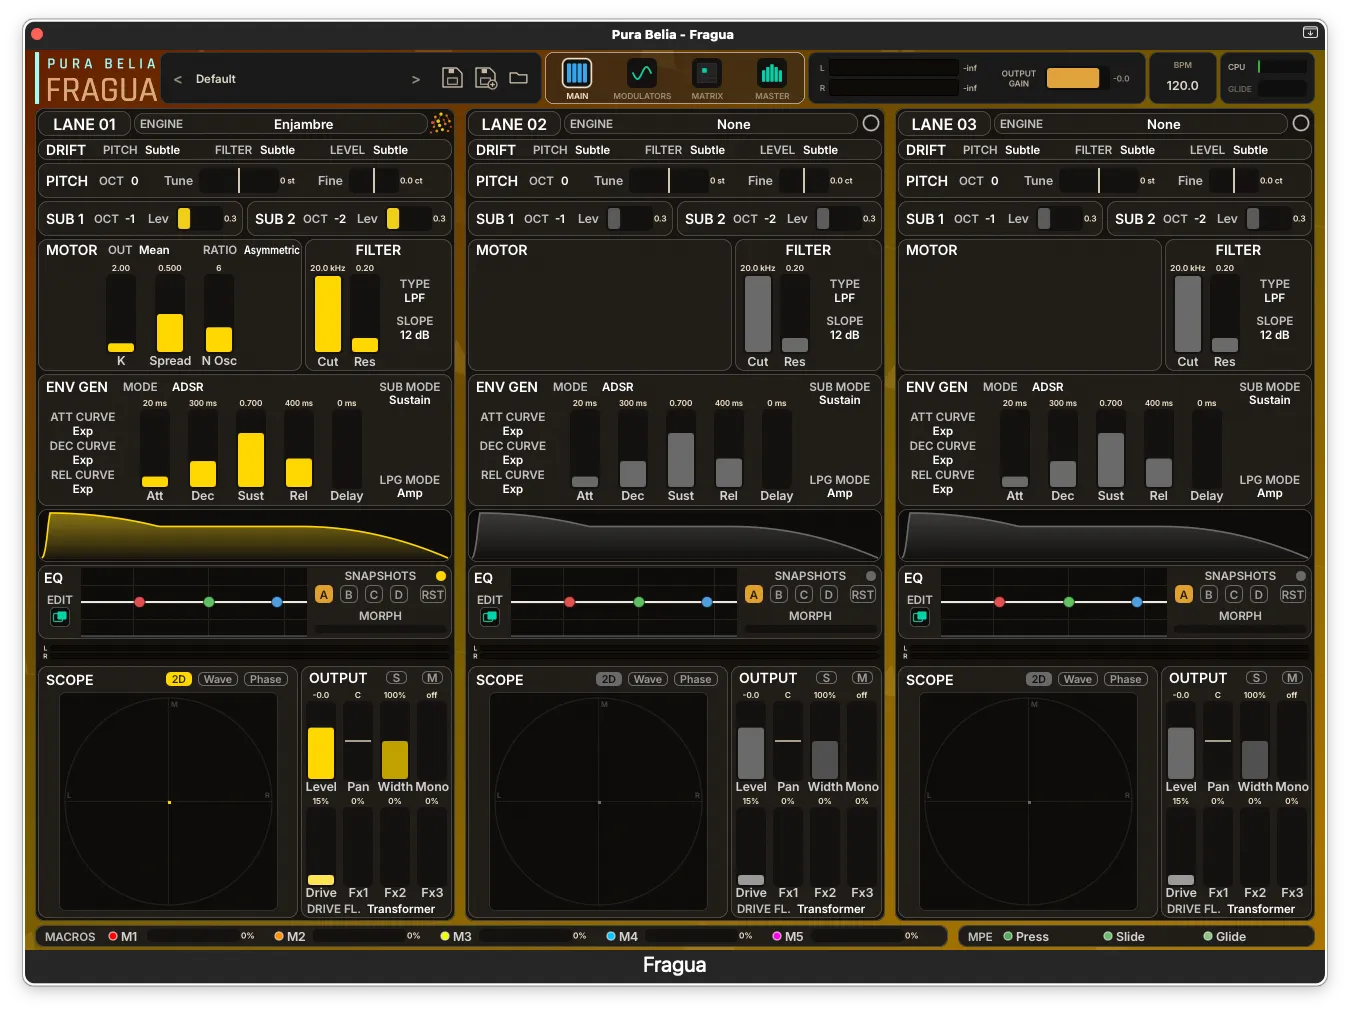
Fragua is organised into four pages, switched from the buttons in the top bar:
- MAIN — the engines and their per-lane voicing chains. This is where a sound is built.
- MODULATORS — the LFO, VENV (vector envelope) and Attractor banks.
- MATRIX — the modulation matrix, MIDI/MPE, keytrack and macros.
- MASTER — the master output chain and FX (with a CHAIN / FX sub-switch).
The top bar
From left to right:
- Pura Belia · Fragua logo.
- Preset bar — the current preset name with ‹ › step arrows; clicking the name opens the preset browser. The three icons beside it are Save (overwrite), Save As and Browse.
- Page buttons — MAIN · MODULATORS · MATRIX · MASTER.
- Output meter & Output Gain — the master L/R level and the global output trim.
- BPM — the host tempo (or an editable value in Standalone), used by all tempo-synced rates.
- CPU meter and GLIDE control.
- Detach Window — pops the current page (or its editor) out into a floating window you can move to a second screen.
The footer
A strip that is always visible:
- MACROS M1–M5 — the five macro controls, each with its live value. Macros are assignable hands-on controls; see §8.
- MPE — Press · Slide · Glide indicators for MPE expression.
Things that work everywhere
- Detach windows. Most editors (per-lane EQ, VENV, Telar, and whole pages) can be pulled out into their own floating window. Closing the window returns the panel home.
- Undo / Redo. ⌘Z / ⇧⌘Z undo and redo patch changes globally — parameters, matrix routings, drawn shapes and more. (Camera/zoom on the 3-D views and scope modes are UI preferences and are intentionally not part of undo.)
- UI scaling. Resize the interface from Settings → UI Size.
- Right-click a control. Almost every fader and knob has a right-click menu — assign it to a macro, modulate it from any source, or see and remove what’s already connected to it.
5. The MAIN Page
MAIN is where you build a sound. The page shows three lanes side by side. Each lane is a complete, independent voice chain: an engine, its sub-oscillators, an envelope, a filter, a 5-band EQ, a scope and an output stage. Every note you play runs through all the lanes that have an engine loaded — so a single key can sound up to three engines at once, each voiced differently.
By default Lane 01 runs Enjambre and the other lanes are set to None (silent). To bring a lane to life, pick an engine from its ENGINE dropdown.
Lanes normally all answer to the same incoming notes, but they don’t have to: each one can be pinned to its own MIDI channel, which turns a single instance into three instruments played from three tracks. That setting lives in Settings → MIDI / MPE — see §12.
The sections below describe one lane from top to bottom. Every lane is identical in layout.
5.1 Lane header — Engine & Power
- ENGINE — the dropdown that selects this lane’s sound engine (or None). The nine engines are described in §6.
- Power. Clicking the engine’s logo powers the lane off with a short fade — it stops rendering and is skipped entirely, which actually frees CPU. A dimmed overlay shows it’s off.
5.2 DRIFT
Three dropdowns — PITCH · FILTER · LEVEL — each set to Off / Subtle / Moderate / Heavy. Drift adds a small, static per-note random offset to pitch, filter cutoff and level, generated fresh for every voice and every lane. It’s the analogue-style “no two notes are exactly alike” spread. Leave it Off for a clinically tight sound; raise it for life and width across a chord.
5.3 PITCH & FINE
- PITCH (OCT) — coarse tuning for the lane in octaves/semitones.
- FINE — fine tuning in cents.
Tuning here is per-lane, so you can detune one engine against another to create beating and thickness across a stack.
5.4 SUB 1 & SUB 2
Two sub-oscillators shared by the lane’s voicing:
- SUB 1 — a copy of the engine pitched down (OCT selects −1/−2/−3), with its own Lev (level). Because it tracks the engine, it keeps the engine’s character an octave down.
- SUB 2 — a pure sine an octave or two below, with a slight L/R detune for width, and its own Lev.
Subs are the fastest way to add weight and fundamental to engines that sit bright or thin.
5.5 MOTOR
The MOTOR panel holds the controls specific to the selected engine — its handful of core parameters. These change completely from engine to engine and are documented per engine in §6. (The Spanish UI labels this panel Motor = “engine”.)
5.6 FILTER
A per-voice filter with a deep palette:
- TYPE — choose from 12 filter types: LPF, HPF, BPF, Notch, Peak, Low Shelf, High Shelf, All-Pass, Ladder (24 dB), Comb, Formant and Phaser.
- SLOPE — 12 / 24 / 36 / 48 dB per octave (one to four cascaded stages). Ladder is a fixed 24 dB.
- Cut — cutoff frequency.
- Res — resonance.
The filter is applied per voice (per note), so resonance and cutoff tracking behave naturally across the keyboard. It can also be driven by the envelope — see LPG MODE below.
5.7 ENV GEN
The lane’s amplitude envelope (and, optionally, its filter gate). Two dropdowns work together: MODE chooses the kind of envelope, and SUB MODE chooses how it sustains or loops.
MODE — four kinds:
- ADSR — the classic Attack / Decay / Sustain / Release, with a Delay pre-attack hold and per-stage curves.
- Vactrol — a faithful opto/LDR model: the soft, laggy response of a vactrol low-pass gate. A new note starts dark and blooms open. The faders switch to the vactrol’s own set — Rise/Fall Fast, Rise/Fall Slow, Mix, plus Memory / Shape / Drift.
- LFO — an LFO shaped as an amplitude envelope, with its own rate and shape controls and tempo sync.
- VENV — a drawable vector envelope (the same kind of shape you build on the MODULATORS page) used as the amplitude envelope, with its own time controls.
SUB MODE — the second dropdown, repopulated for the chosen mode, decides how the envelope sustains or loops:
- ADSR: Sustain (normal) · One-Shot (after Decay, Release completes automatically and ignores note-off — “it finishes on its own, like a clap of thunder”; set Sustain to 0 for a pure AD pluck).
- VENV: 1-Shot · Sustain · Sustain-Loop (loops the band between the Decay and the S/R point — shown as a yellow strip on the shape).
- LFO: Sustain (loops while the key is held) · One-Shot (a single pass).
- Vactrol: responds to gate on/off directly.
Other controls:
- ATT / DEC / REL CURVE — Exp / Log / Lin shaping per stage (ADSR).
- LPG MODE — Amp or Amp + Filt. In Amp + Filt the envelope also opens and closes the filter cutoff (a low-pass gate). Combine Vactrol + Amp + Filt for the classic vactrol-LPG “bloom.”
The whole ENV GEN can itself be a modulation destination — see §8.
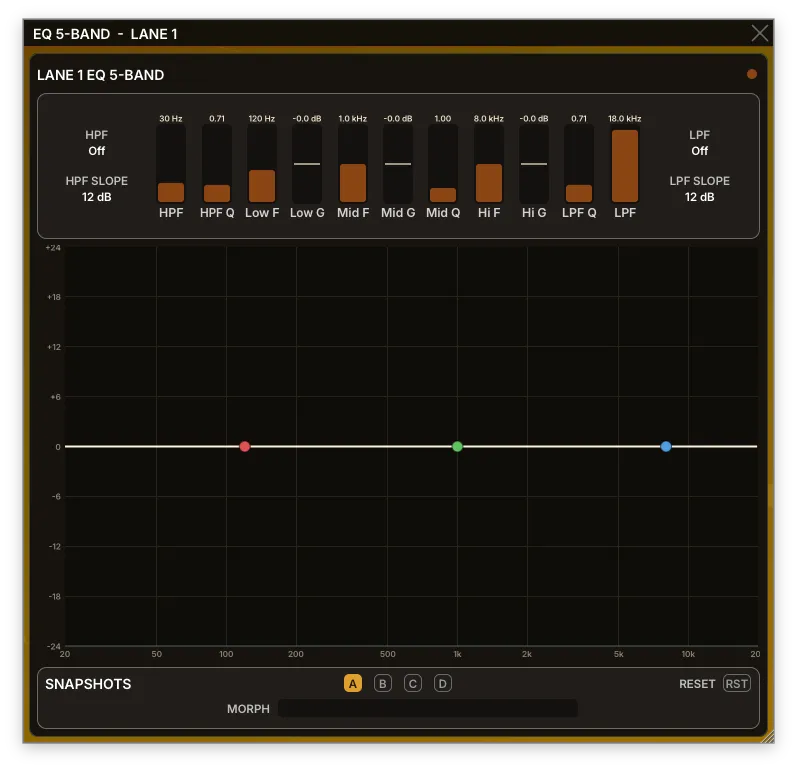
5.8 EQ — 5-band per lane
Each lane has its own 5-band EQ on the summed voices, with a live analyzer and an interactive curve.
- Bands — HPF · Low shelf · Mid bell · High shelf · LPF. The HPF/LPF have selectable slopes; the shelves and bell have gain (and the mid has Q). Drag the coloured nodes on the curve to set frequency and gain; use the mouse wheel on a node for Q.
- SNAPSHOTS A / B / C / D + MORPH. Store up to four EQ states and morph smoothly between the active ones with the MORPH control. The selected snapshot is the live curve — selecting A/B/C/D loads it into the faders so you hear what you edit. RST clears to a single flat snapshot.
- EDIT / detach. Open the full per-lane EQ editor in its own window for a fader row, axis labels and a larger display.
5.9 SCOPE
A live visualiser for the lane. The chips above it switch between modes:
- 2D — a stereo vectorscope (the default).
- Wave — the lane’s waveform.
- Phase — a phase portrait of what the engine itself is doing, not just what comes out of it.
- Grain — a fourth mode that appears only when the lane runs Telar, showing its grain cloud. For Telar, Phase is the real hybrid morph + chaos portrait of the engine.
The scope follows solo/mute, so you can isolate exactly what you’re looking at. The chosen mode is a UI preference — it is remembered per lane but is not stored in presets.
5.10 OUTPUT
The lane’s output stage, applied to the summed voices:
- Solo / Mute (S / M). The two chips in this panel’s header — M pinned to the right edge, S just left of it. Mute silences the lane (its scope and meters fall to zero); solo is additive, so you can solo several lanes to hear just those. Neither one saves CPU: the engine keeps running and only the lane’s bus is silenced — for that, use Power (§5.1).
- Level — lane volume.
- Pan — stereo placement.
- Width — mid/side width (0 = mono … 2 = wide).
- Mono — bass-mono crossover: everything below the set frequency collapses to mono (0 = off). Useful for keeping sub frequencies centred.
- Drive / DRIVE FL. — a per-lane drive stage with five flavours (Tape / Clip / Fold / Transformer / Wavefolder); the FL. label shows the current flavour.
- Fx1 · Fx2 · Fx3 — the three send levels from this lane to the FX buses A/B/C, read out in dB (−inf … 0.0) (see §10).
6. The Engines
The nine engines are the heart of Fragua. Everything around an engine — sub-oscillators, envelope, filter, EQ, output — is the same shared lane chain (§5); what changes from engine to engine is how the raw sound is generated and the handful of MOTOR controls that shape it.
Each engine is built on a different chaotic or generative system. Some are pitch-tracking (they follow the keyboard like a normal oscillator); three are pitch-inert by nature — their motion comes from the system’s own dynamics, not from the note, so you give them pitch with SUB 2 (see §5.4) or, for Mitosis, its built-in band-pass.
The control labels below are exactly as they appear on screen. Faders are listed left to right; menus are the dropdowns in the MOTOR panel.
6.1 Enjambre — swarm
An additive bank of coupled phase oscillators (a Kuramoto model). Many sine oscillators pull on each other’s phase: with weak coupling they scatter into inharmonic partials; with strong coupling they lock into one coherent, shimmering tone. The output is the mean of the swarm.
- Pitch: follows the keyboard.
- MOTOR controls:
- K — coupling strength (0–15, default 2). Low = scattered, searching partials; high = a locked, coherent tone.
- Spread — how far apart the oscillator ratios are spread (0–1, default 0.5).
- N Osc — number of active oscillators (3–12, default 6). New/old oscillators fade in and out cleanly.
- OUT (menu) — Mean (simple average) or Coherent (emphasises how synchronised the swarm is, more dynamic).
- RATIO (menu) — the distribution of oscillator ratios: Asymmetric · Linear · Golden · Harmonic · Random.
- Character: from inharmonic clouds “searching” for unison (low K) to a glassy, coherent shimmer (high K). Spectral pads, evolving drones, hypnotic textures.
Hysteresis — a note on K. The swarm’s jump into (and out of) synchrony is hysteretic: the K where the sound breaks up on the way up is not the K where it comes back on the way down — once the swarm settles into a regime it holds on to it, so returning takes going noticeably lower. Around the critical zone the swarm synchronises only partially — some oscillators lock while others keep slipping phase — which sounds rough and torn before it cleans up again at higher K. Where that zone sits depends on the note you play (higher notes push it up), on Spread and on RATIO. None of this is a glitch: it’s the coupled-oscillator model doing exactly what it says, and it lives inside a held note — every new note re-seeds the swarm, so retriggering starts the story over. Hold a low note, raise K slowly (Shift + drag helps you stay inside the band instead of jumping over it), and listen for where it tears.
6.2 Pozo — well
A forced Duffing oscillator — a “double-well” system integrated in real time. At low drive the sound sits cleanly in one well; pushed harder it jumps chaotically between the two, throwing off inharmonic spectra.
- Pitch: follows the keyboard (the well’s natural frequency is the note).
- MOTOR controls:
- Gamma — drive amount (0–1, default 0.3). Higher = more violent, more chaotic jumps.
- Delta — damping (0.01–1, default 0.1). Low = long, resonant; high = short, damped.
- Omega — drive-to-pitch ratio (0.25–4, default 1.0). 1.0 sits at resonance; off-ratios give beating.
- Stiff — the shape of the well, i.e. the cubic term (0.5–3, default 1.0). Higher = sharper transitions, more harmonics.
- FB — feedback of the oscillator’s motion back into the drive (0–1, default 0). Adds energy loops and richer chaos.
- OUT (menu) — Position · Velocity · Blend.
- DRIVE (menu) — the waveform that forces the well: Sine · Square · Triangle · Saw · Noise.
- Character: tonal and resonant when gently driven; gnarly and chaotic when pushed. Complex basses, bell-like tones, friction and ambiguity.
6.3 Hilo — thread
A three-dimensional chaotic flow (a Sprott-type attractor) integrated continuously, weaving smooth, sinuous chaotic orbits.
- Pitch: follows the keyboard.
- MOTOR controls:
- Chaos — amount of chaos (0.1–3, default 1). Low = quasi-periodic and organic; high = turbulent.
- Damp — damping of the flow (0.1–3, default 1).
- Omega — frequency ratio (0.25–4, default 1).
- FB — self-feedback (0–1, default 0).
- OUT (menu) — which axis of the attractor you hear: X · Y · Z · Blend.
- Character: flowing, thread-like motion — organic at low chaos, turbulent at high. Evolving textures and synthetic basses that follow the keyboard.
6.4 Confluencia — confluence
Two classic strange attractors — Lorenz and Rössler — run in parallel and are mixed together. Where the two flows meet gives the engine its name.
- Pitch: pitch-inert. The oscillation comes from the attractors’ own natural rates, not the note — give it pitch with SUB 2.
- MOTOR controls:
- LorLvl — Lorenz level in the mix (0–1, default 0.7).
- RosLvl — Rössler level in the mix (0–1, default 0.7).
- Sigma — the Lorenz σ parameter (5–20, default 10).
- C — the Rössler c parameter (4–8, default 5.7).
- LOR (menu) — Lorenz output axis: X · Y · Z · Blend.
- ROS (menu) — Rössler output axis: X · Y · Z · Blend.
- Character: dark, quasi-harmonic textures at low levels; full chaos at high. Ambient pads, electroacoustic soundscapes, unpredictable basses.
6.5 Arena — sand
Discrete chaotic maps — the Logistic map and the Hénon map — iterated every sample, with a morph between them. Grains of fractal chaos rather than a continuous flow.
- Pitch: pitch-inert. Give it pitch with SUB 2.
- MOTOR controls:
- Morph — crossfade from Logistic (0) to Hénon (1) (default 0.5).
- R — the Logistic r (3.6–3.95, default 3.9). Lower = more periodic; higher = full chaos.
- A — the Hénon a (0.8–1.4, default 1.4).
- B — the Hénon b (0–0.4, default 0.3).
- Brillo — a one-pole low-pass “brightness/smoothing” of the raw map output (0–1, default 0).
- Drift — a slow internal LFO that nudges R/A for movement (0–1, default 0).
- Character: granular, impulsive and noisy toward Logistic; smoother strange-attractor orbits toward Hénon. Granular textures, noisy effects, fractal soundscapes.
6.6 Arco — arc / bow
A Chua “double-scroll” attractor — the classic chaotic circuit — integrated in real time. Its arc-shaped phase portrait gives the engine its name.
- Pitch: follows the keyboard.
- MOTOR controls:
- Alpha — coupling between the circuit’s axes (8.5–11, default 10). The main bifurcation control.
- Beta — dissipation (13.5–18.5, default 15).
- Omega — frequency-scale ratio (0.5–8, default 3.5).
- Character: a chaotic tone with audible internal motion that bifurcates wildly as you move Alpha/Beta. Crunchy basses, chaos-modulated pads, incisive leads.
- Note: Arco runs on three real parameters, so its MOTOR panel shows three faders. (The lab’s stereo “SHADE” path is not currently exposed.)
6.7 Mitosis — cell division
A reaction-diffusion system (Gray-Scott) on a small grid: two fields feed and kill one another, forming and splitting patterns like dividing cells. The audio is read from the resulting field.
- Pitch: pitch-inert. Give it pitch with SUB 2, or anchor it with the built-in band-pass (BPF below).
- MOTOR controls:
- F — feed rate (0.020–0.060, default 0.0367).
- K — kill rate (0.040–0.075, default 0.0649).
- Drift — a slow LFO on F/K (0–1, default 0.3). Keep this above zero — with no drift the reaction settles into silence.
- BPF — amount of a note-tracking band-pass inside the engine (0–1, default 0). This is how you give Mitosis a sense of pitch.
- Q — resonance of that band-pass (0.5–15, default 5; active only when BPF > 0).
- Character: electric, crackling, rhythmic texture with no fixed pitch — until you raise BPF. Breathing pads, ambient beds, granular artefacts.
6.8 Crisol — crucible
An additive bank of 32 sine partials whose amplitudes are steered live by a sub-audio Lorenz attractor — an ever-shifting spectrum melted together in the crucible.
- Pitch: follows the keyboard (the whole bank shifts while keeping its harmonic ratios).
- MOTOR controls:
- Chaos — how hard the Lorenz drives the spectrum (0.5–2, default 1).
- Density — number of active partials (4–32, default 32). Lower = airier and sparser.
- Smooth — how quickly the spectrum is allowed to move (0–1, default 0.3). Low = chirpy and fast; high = slow and liquid.
- Drive — tanh saturation at the output (0.1–2, default 0.7).
- Character: warm, organic and alive — atmospheric textures, evolving basses, resonant leads with hypnotic spectral motion.
- Note: Crisol is the one engine that benefits from the Engine HQ quality option — its sine bank is the only engine that aliases measurably, and HQ adds internal 2× oversampling. See Settings.
6.9 Telar — loom
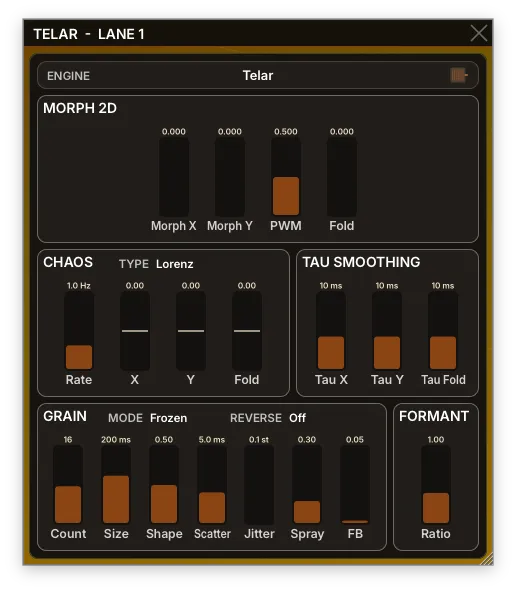
The deepest engine: a 2-D morphing wavetable oscillator woven into a granular layer, with a sub-audio chaos modulator that rewrites the shape as it plays. Four corners (sine / triangle / saw / square) are morphed in X and Y, folded, then sampled by a cloud of independent grains — each with its own pitch jitter, stereo spray and morphable envelope. A Lorenz / Rössler / Chua / Duffing modulator (smoothed per-axis by TAU) keeps the weave moving, and every voice runs its own chaos so chords stay alive instead of moving in lockstep.
- Pitch: follows the keyboard.
- MOTOR controls (the curated lane panel):
- X — morph along the X axis (0–1).
- Y — morph along the Y axis (0–1).
- PWM — square-wave duty cycle (0.05–0.95, default 0.5).
- Fold — wavefolder amount (0–1, default 0 = clean).
- Size — grain size (1–1000 ms, default 200).
- Ratio — formant ratio (0.25–16, default 1.0 = bypass).
- CHAOS (menu) — the modulator’s attractor: Lorenz · Rössler · Chua · Duffing.
- GRAIN (menu) — Frozen (each grain captures the shape when it is born) or Continuous (grains read the live morph as you move it).
- Telar editor (EDIT / detach): because Telar has far more parameters than fit in a lane, the panel shows a curated subset and the editor exposes everything — MORPH 2D (X / Y / PWM / Fold), CHAOS (Type, Rate, and bipolar X / Y / Fold amounts), TAU smoothing (X / Y / Fold), GRAIN (Mode, Reverse, Count, Size, Shape, Scatter, Jitter, Spray, FB) and FORMANT (Ratio).
- Character: living granular textures — glacial pads, shifting timbres, micro-dynamic leads. Feedback adds grit; the chaos modulator adds organic unpredictability, held in focus by TAU.
7. Modulators
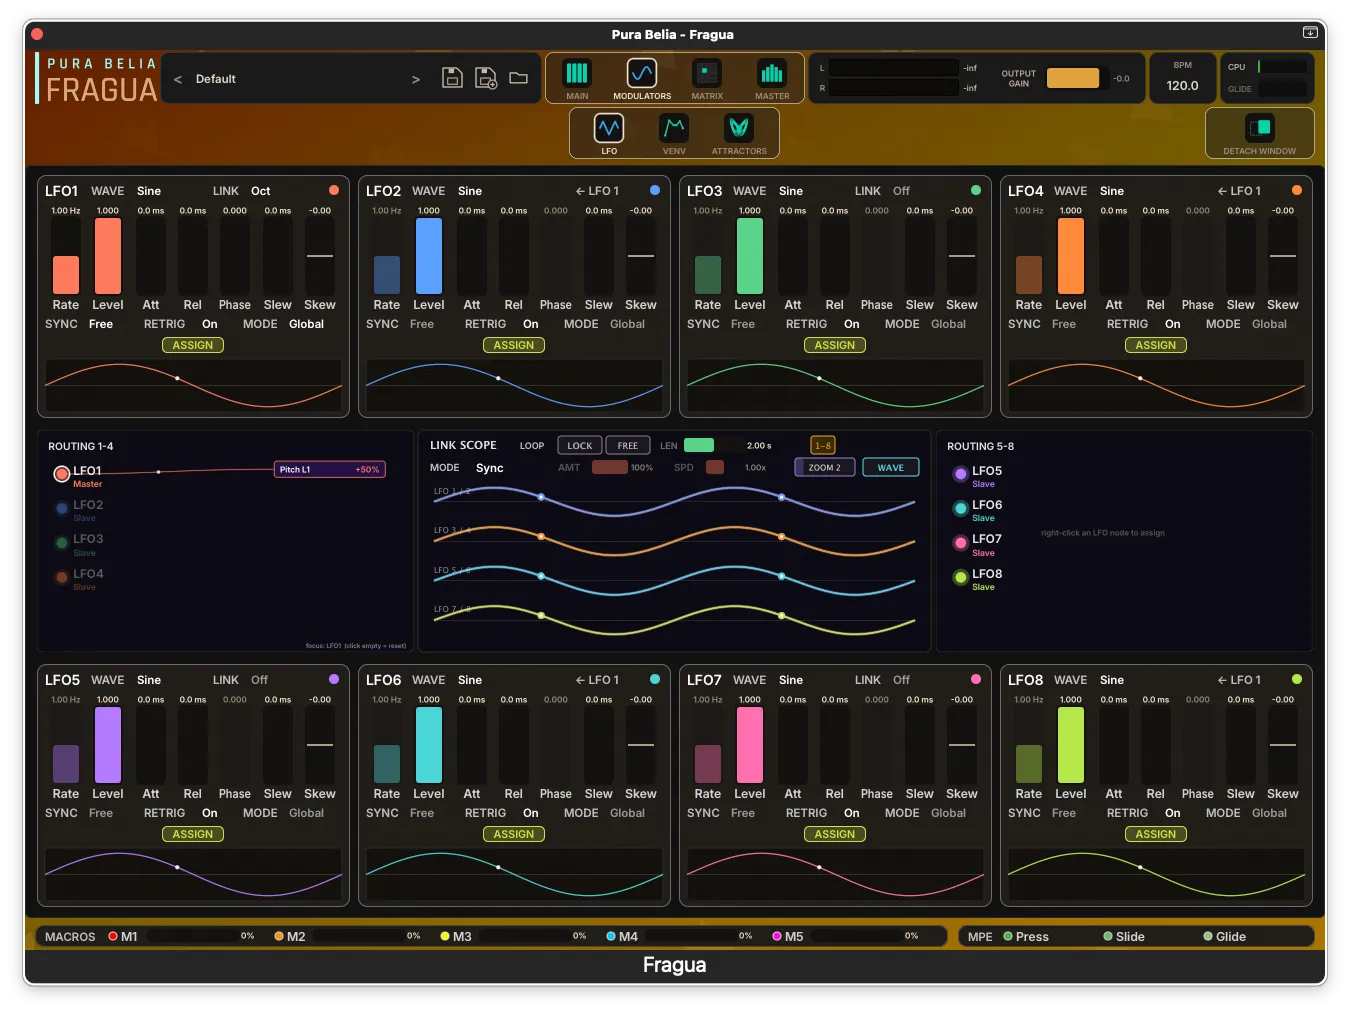
The MODULATORS page holds three banks of modulation sources: 8 LFOs, 4 VENV (drawable vector envelopes) and 4 Attractors (chaotic modulators). Any of these can be routed to almost any parameter — either from the Matrix or by right-clicking a control and choosing Modulate with…. Each slot shows a small ROUTING panel listing where it is currently sent.
Three ideas are shared across all three banks:
- Global vs Poly. A Global modulator is one shared instance; a Poly modulator runs one copy per voice, so each note gets its own, de-correlated movement.
- SYNC — Free or Host. Free sets the rate in Hz (or seconds); Host locks it to musical divisions of the project tempo (1/32 … several bars).
- ON / ASSIGN. Each slot has an ON chip (turning a slot off skips its DSP and saves CPU) and an ASSIGN button that arms “learn” so the next destination you touch gets wired to this source.
7.1 LFO (×8)
Eight low-frequency oscillators. Per LFO:
- WAVE — the shape: the classics (Sine, Triangle, Saw, Pulse) plus a set of “bank” and Forge shapes and random/Perlin waves.
- SPEED / RATE — rate in Hz (Free) or a musical division (Host).
- LEVEL — output depth. PHASE — start phase. SLEW — smooths sharp transitions. SKEW — bends the waveform’s symmetry.
- ATK FADE / REL FADE — fade the LFO’s depth in on note-on and out on note-off.
- SYNC (Free/Host) · MODE (Global/Poly) · RETRIG (restart phase on each note) · ON.
- A mini-scope shows the live shape with a moving playhead.
Link (LFO 1, 3, 5 and 7 only). These four can act as the master of a linked group — Dual (2) / Quad (4) / Oct (8) — so several LFOs move together in a chosen relationship (Sync, Phase, Divide, Pendulum, Mirror, and more). This is the “Oct link” shown in one of the screenshots. The central LINK SCOPE overlays the linked LFOs so you can see the relationship.
LOOP (one setting for all eight). At the top of the band, next to the title, a single LOOP section applies to the whole LFO bank: LOCK, a length (LEN) and its own SYNC (Free / Host).
It exists for the stateful waves — the Random shapes and Perlin — which by their nature never repeat: every pass is different. Switch LOCK on and they are re-seeded deterministically at each loop boundary, so what they produce becomes repeatable — the same “random” movement every time round, which is what makes those waves usable in an arrangement rather than only as texture. Periodic waves (Sine, Triangle, Saw…) already repeat, so LOCK does nothing to them.
LEN is the length of that loop: seconds when SYNC is Free (0.25–16 s), or a musical division when it is Host — from a quarter of a bar up to eight bars, including triplets and dotted values. And it is itself a modulation destination (LFO Loop Len), so the loop length can be modulated like anything else.
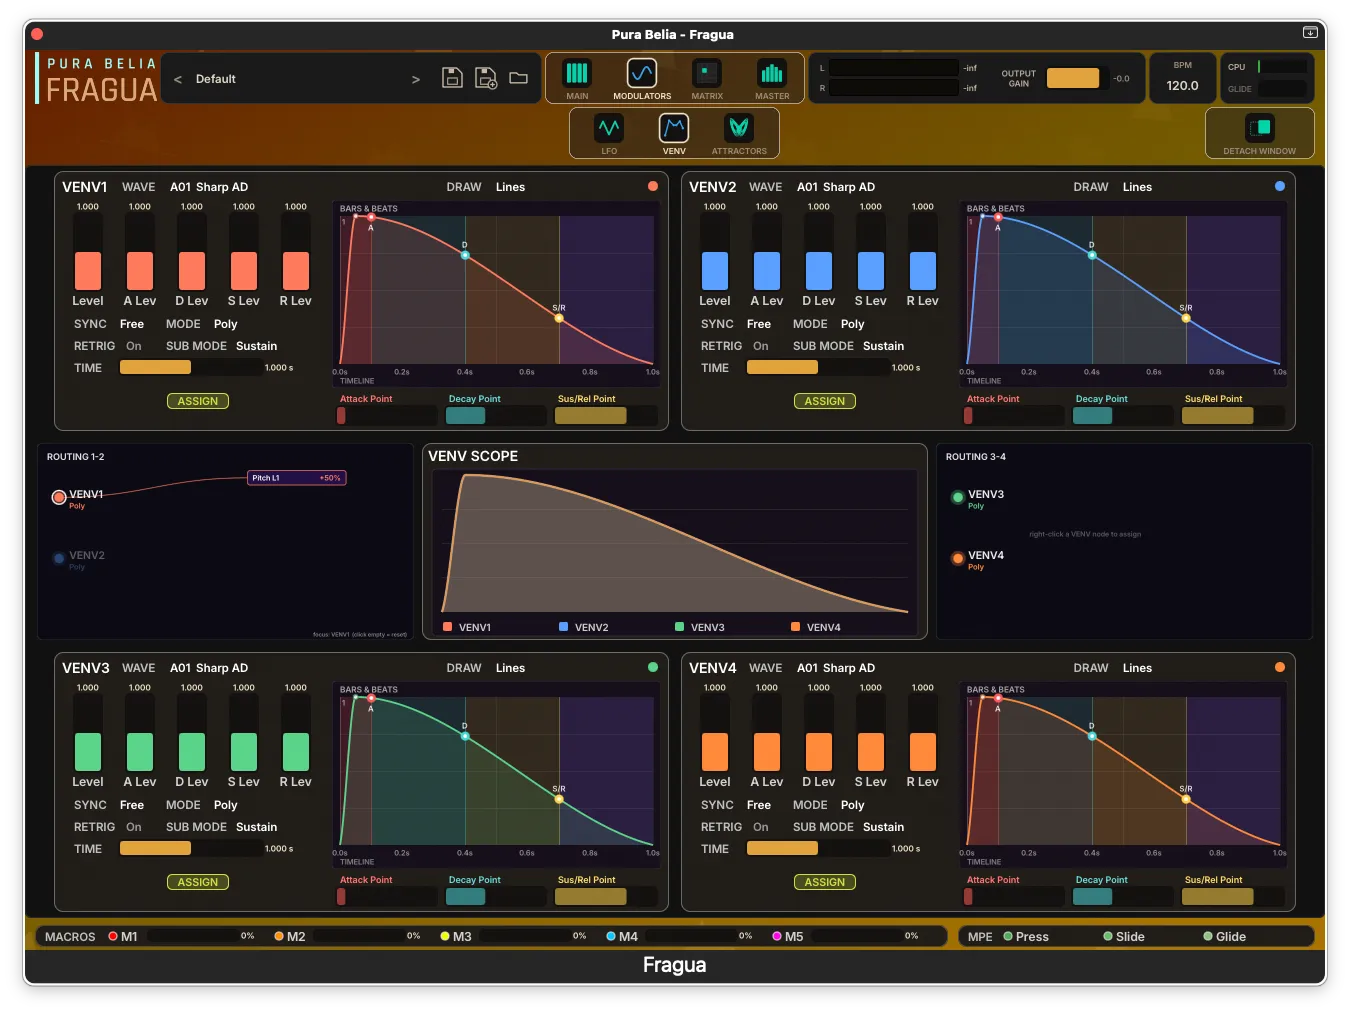
7.2 VENV (×4) — Vector Envelopes
Four drawable envelopes. Instead of A/D/S/R faders, you draw the shape on a canvas and the envelope traces it over time.
- The canvas. Drag the breakpoints to reshape the curve; the DRAW mode switches between Lines (move breakpoints) and Free (draw freehand). A live playhead shows where the envelope is.
- WAVE — pick one of 100 factory shapes (banks A–J), or use Save / Save As / Browse here to manage your own shapes in the shared VENV shape bank (see §11).
- TIME — how long the shape takes to play (seconds in Free, a division in Host). LEVEL — output makeup.
- A / D / S / R zone levels — four faders that scale each stage of the shape without redrawing it.
- Attack / Decay / Sus-Rel points — fine sliders under the scope that set the zone boundaries.
- SYNC · MODE (1-Shot / Sustain / Sustain-Loop — Sustain-Loop loops the band between Decay and the S/R point) · VOICING (Global/Poly) · RETRIG · ON.
7.3 Attractor (×4)
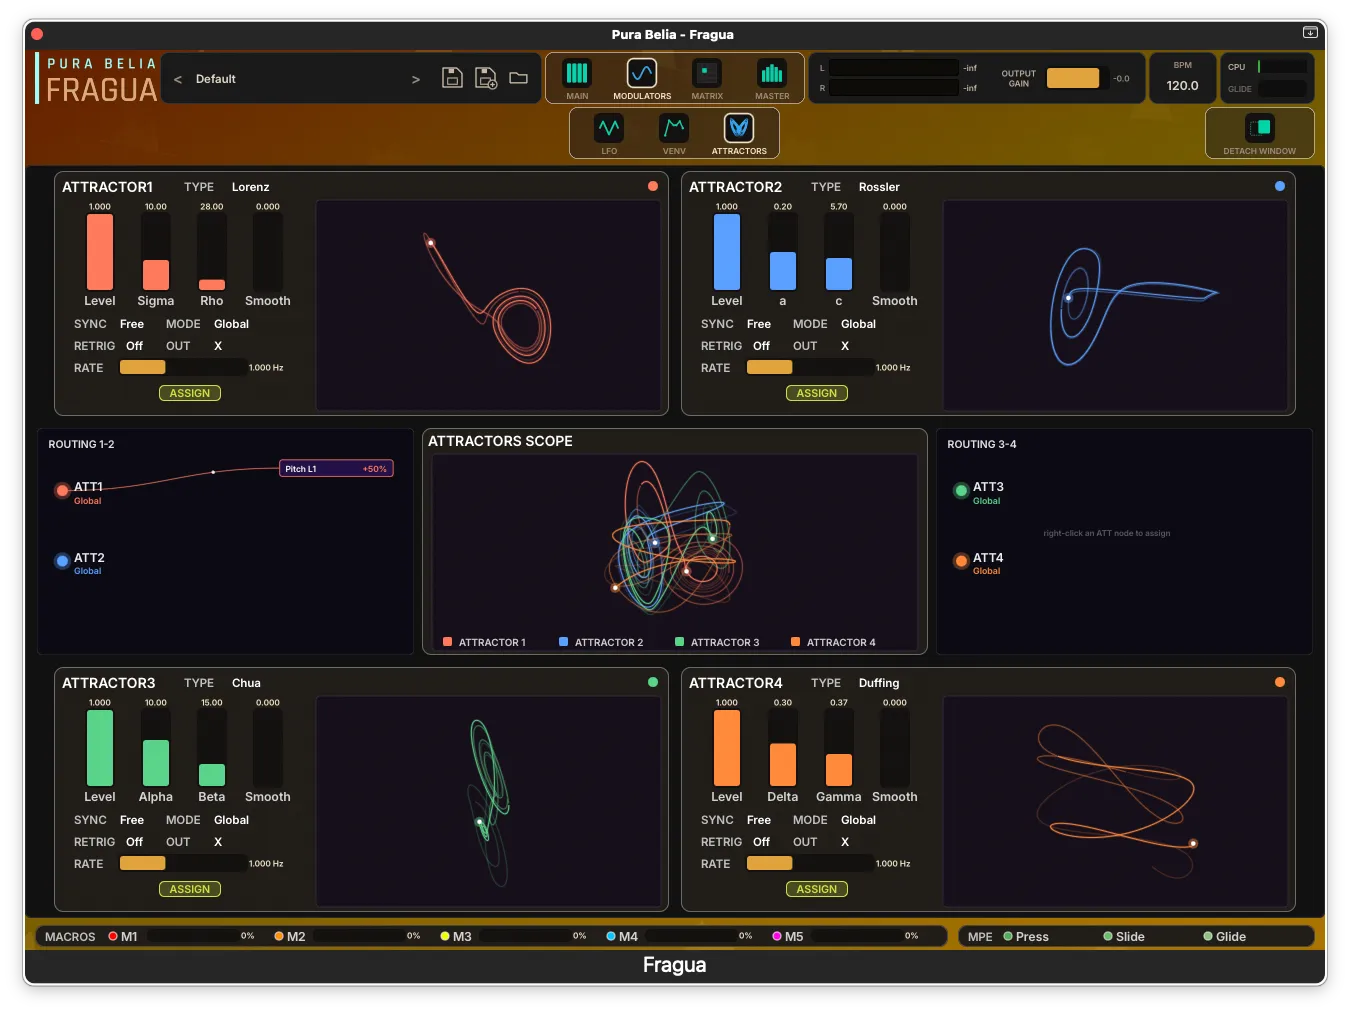
Four chaotic modulators — the same family of strange attractors that drive the engines, here used as smooth, never-repeating modulation.
- TYPE — Lorenz · Rössler · Chua · Duffing · Sprott B. Each has its own character (Lorenz’s two-lobed flip, Rössler’s slow spiral, Chua’s angular double-scroll, Duffing’s two-well jumps, Sprott’s elegant flow).
- RATE — speed in Hz (Free) or a division (Host).
- P1 / P2 — the two native coefficients of the chosen attractor; their labels change with TYPE (e.g. Sigma/Rho for Lorenz).
- SMOOTH — slews the output to tame sudden jumps. LEVEL — output depth.
- OUT — which axis you take as the modulation: X · Y · Z · Blend.
- SYNC · MODE (Global/Poly) · RETRIG · ON.
- A small 3-D phase portrait shows the attractor’s trajectory; you can rotate it.
8. The Modulation Matrix
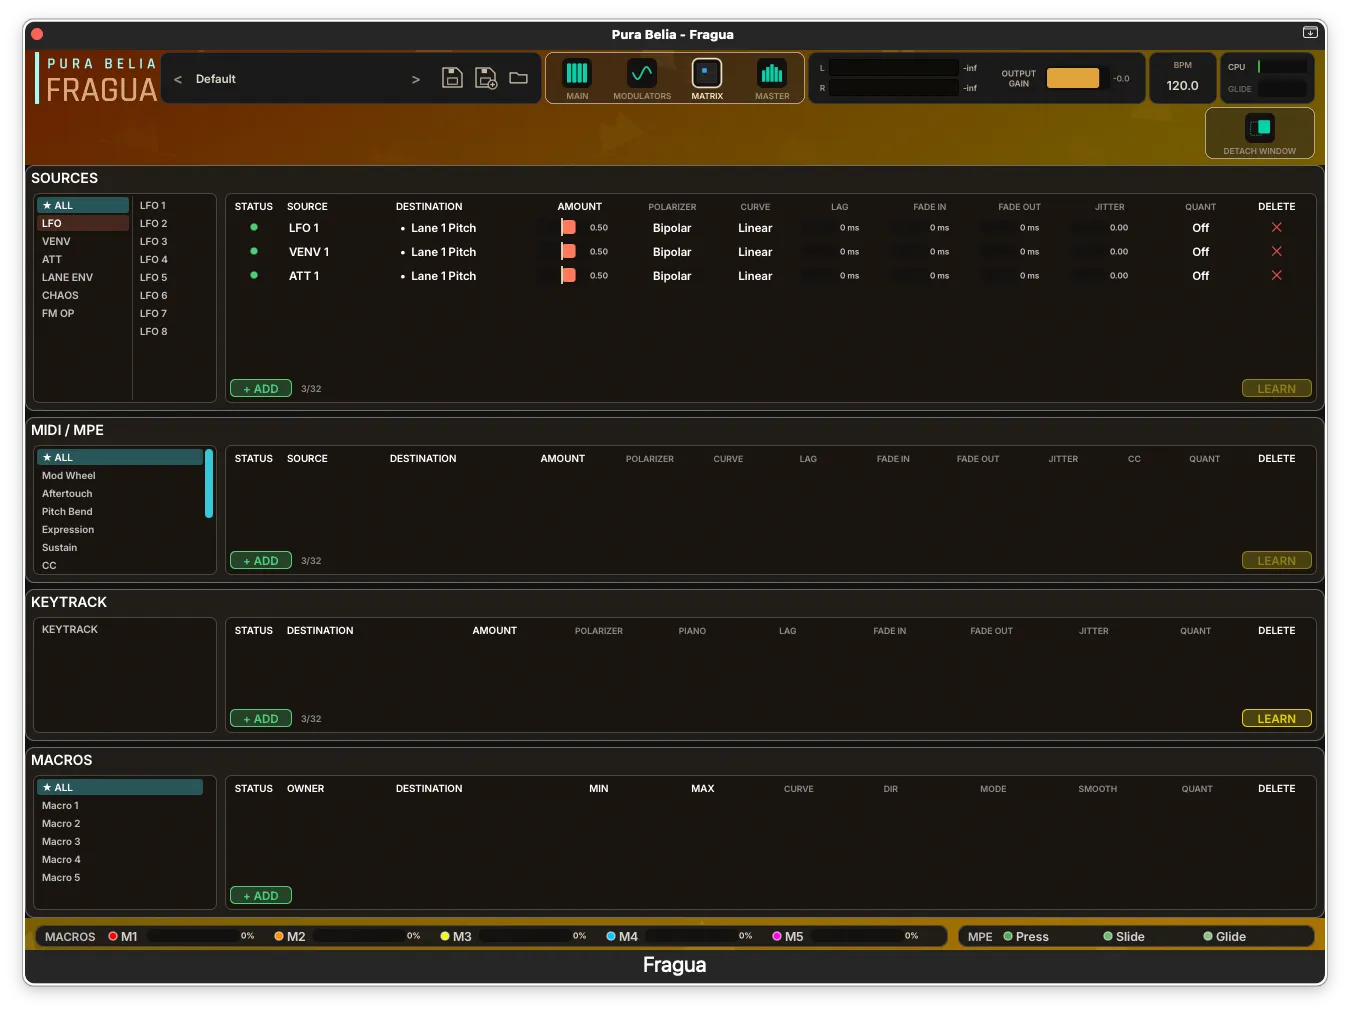
The MATRIX is Fragua’s central modulation hub. Every connection follows the same shape: a source modulates a destination by an amount, with optional shaping (curve, polarity, lag, fades, jitter). The page is split into four sections, each a list of rows you fill in: SOURCES, MIDI / MPE, KEYTRACK and MACROS.
Making a connection
You can wire modulation in two ways:
- In the Matrix — add a row, pick a DESTINATION (a nested menu of every modulatable parameter: each lane, the master chain, the FX bus levels, even other modulators), set the AMOUNT fader, and you’re done.
- By right-clicking a control — almost every fader has a Modulate with… menu that creates the connection for you, and a “Connected” section that shows what already drives it (and lets you remove it in one click).
Each row carries a STATUS light: green = active, blue = part of a loop, amber = the destination’s engine isn’t loaded, red = an invalid pairing, grey = off/empty.
SOURCES
The modulators and internal signals you can route: the 8 LFOs, 4 VENV, 4 Attractors, the 4 lane envelopes, chaos taps, and the FM operator sources (the audio-rate cross-modulation feature). Each row offers:
- AMOUNT — depth, −1…+1 (negative inverts).
- POLARITY — Unipolar (0→1) or Bipolar (−1→+1).
- CURVE — Linear · Exp · Log · S-Curve, shaping the source before it’s applied.
- LAG — smooths the modulation (anti-zipper), in ms.
- FADE IN / FADE OUT — ramp the modulation in/out.
- JITTER — adds a touch of randomness.
- QUANT — for pitch destinations only: snap to Semitone or to a Scale (Major / Minor / Penta / Chromatic).
- DELETE (✕) — clears the row.
MIDI / MPE
Performance sources: Mod Wheel, Aftertouch, Pitch Bend, Expression, Sustain, generic CC, Velocity, Release Velocity, and the per-note MPE Pressure / Slide / Pitch Bend. Same columns as SOURCES, plus a CC field on the generic-CC row with a right-click Learn MIDI CC (touch a knob on your controller to capture its number).
KEYTRACK
A single source — the note number — mapped through an editable piano curve. Instead of a Curve menu the row shows a small thumbnail of the curve; click it to open a full editor where you draw how each MIDI note maps to the output. Useful for making timbre, filter or any parameter track the keyboard however you like.
MACROS
The five macros (M1–M5, shown in the footer) are hands-on controls you assign to one or many destinations. Per assignment:
- OWNER — which macro (M1–M5) drives it.
- MIN / MAX — the range of the destination the macro sweeps from 0 to 1.
- DIR — Normal or Inverted. CURVE — Linear/Exp/Log/S-Curve. SMOOTH — slew. QUANT — for pitch.
- MODE — Absolute (the macro sets the parameter, ignoring its manual position) or Relative (the macro adds on top of where you left the fader). Relative is the default and is what you usually want.
The macro knobs themselves don’t jump when you grab a fader they control — the macro’s influence is drawn as a band around the fader, so manual and macro control stay coherent.
Tip. To remove a connection you don’t have to find it in the Matrix — right-click the destination fader, and its “Connected” section lets you remove any source or macro directly.
9. The MASTER Page
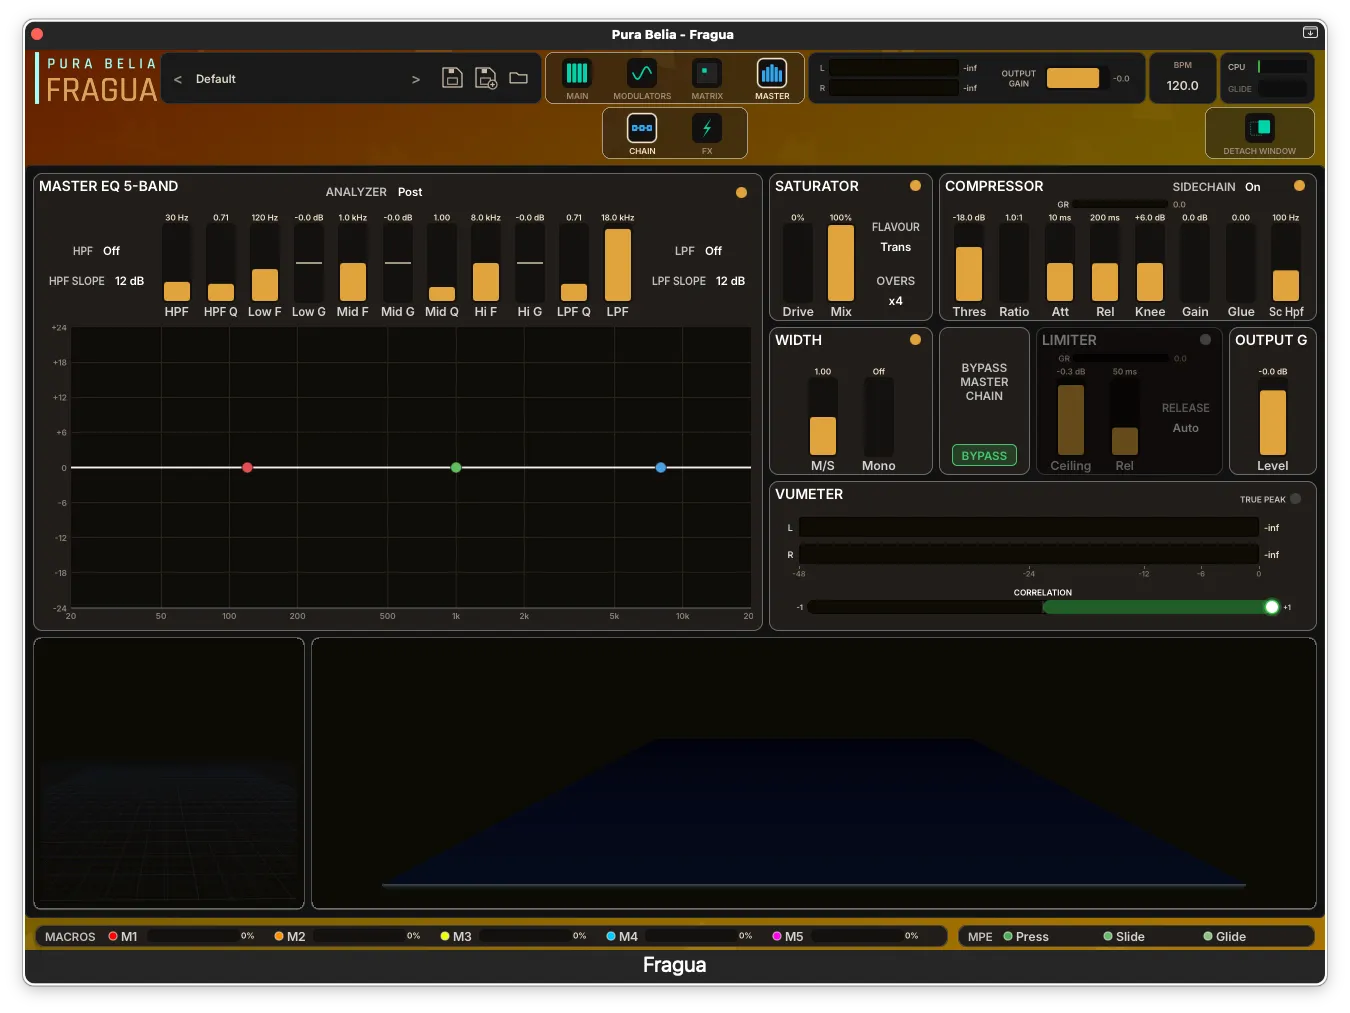
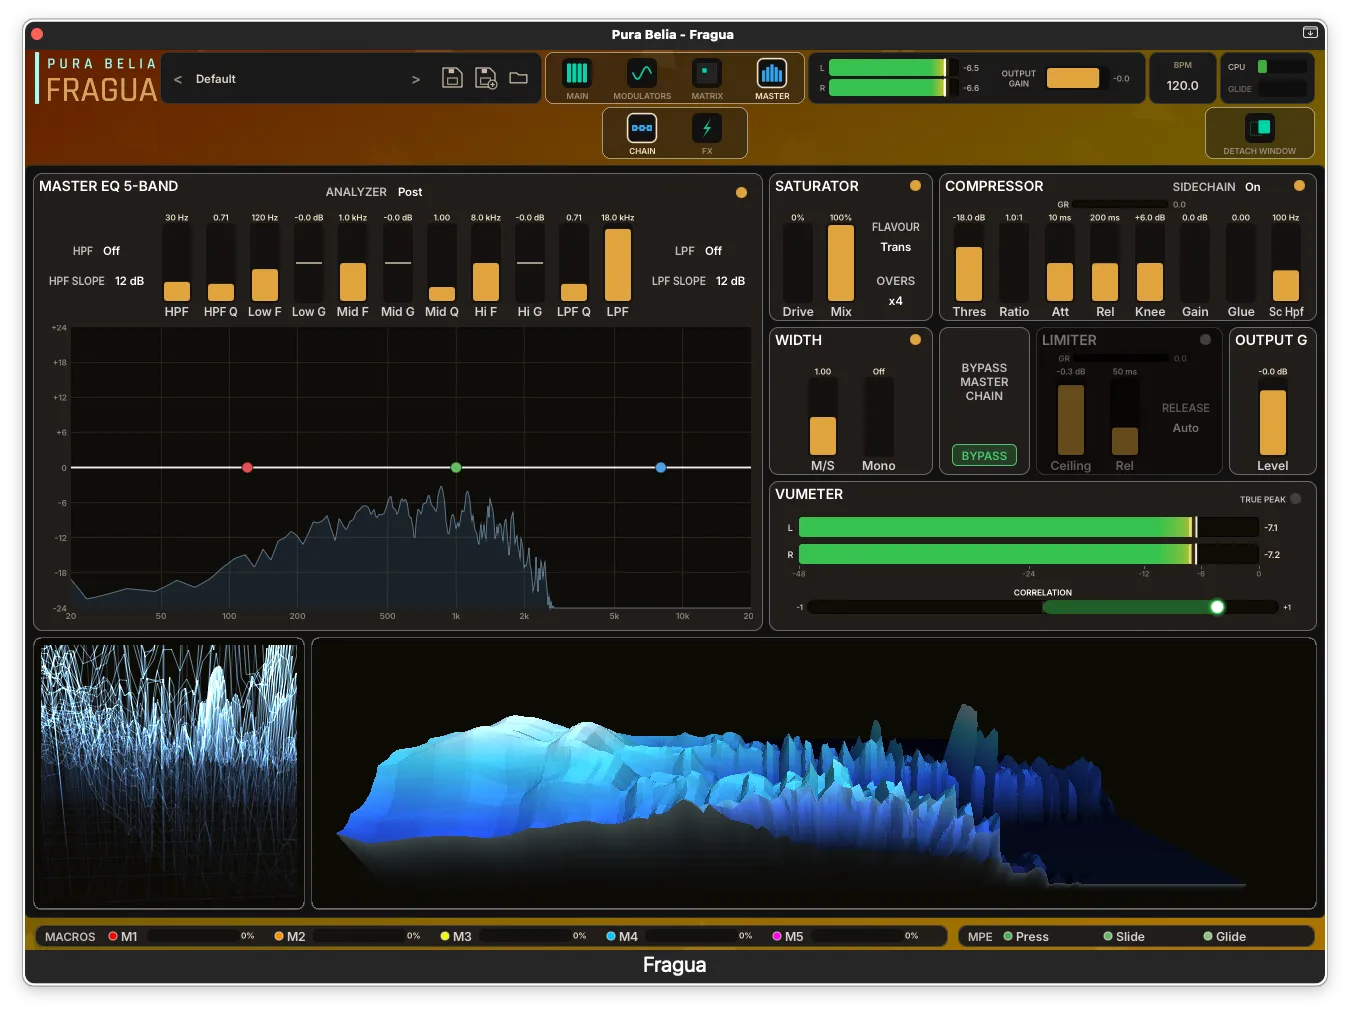
MASTER is the finishing chain for the whole instrument — a built-in mastering section so patches arrive polished. It has two sub-tabs, CHAIN and FX (FX is §10); this section covers CHAIN. The signal runs through a fixed order:
EQ → Saturator → Compressor → Width → Limiter → Output Gain
Each module has an amber dot in its header to switch it on or off, and a global BYPASS MASTER CHAIN button bypasses the colour stages (EQ/Sat/Comp/Width) while keeping the Limiter and Output Gain active for safety. Defaults are neutral, so an untouched master chain is transparent.
Master EQ (5-band)
The same EQ engine as the lanes, on the master bus: HPF · Low shelf · Mid bell · High shelf · LPF, with selectable HPF/LPF slopes (12/24/36/48 dB) and a live, draggable curve. The ANALYZER dropdown shows the spectrum Off / Pre / Post / Pre+Post around the EQ.
Saturator
- Drive — saturation amount (at 0 it’s transparent).
- Mix — parallel dry/wet blend.
- FLAVOUR — Trans (transformer, odd harmonics, band-limited — iron and edge) or Tube (even harmonics, warm).
- OVERS — internal oversampling Off / ×2 / ×4 to keep saturation clean.
Compressor
A stereo feed-forward compressor: Thres · Ratio · Att · Rel · Knee · Gain (makeup), plus Glue (blends toward a stickier, SSL-style feedback character), Sc Hpf (high-pass the detector so bass doesn’t pump the whole mix) and a SIDECHAIN on/off. A live GR meter shows gain reduction. At Ratio 1:1 (the default) it’s neutral.
Width
- M/S — stereo width, 0 (mono) … 1 (unchanged) … 2 (wide).
- Mono — a bass-mono crossover: everything below this frequency collapses to mono (0 = off). Keeps low end centred and translation-safe.
Limiter
A true-peak limiter for the final ceiling: Ceiling (in dBTP), Rel (release), and a RELEASE mode of Manual or Auto (program-adaptive). Off by default (it adds a little look-ahead latency when on). Has its own GR meter.
Output Gain
The final Level trim, applied after the whole chain.
Metering — VUMETER
Live monitoring of the master output: L / R level bars with peak-hold and dB readouts, a TRUE PEAK indicator that lights when you exceed the safe ceiling, and a CORRELATION meter (+1 = mono-compatible, 0 = wide, negative = out of phase).
3-D visualisers
The bottom strip is Fragua’s OpenGL display (it can be turned off in Settings → Quality):
- Wide slot — a 3-D spectrum waterfall of the master output. Click cycles through camera angles; the mouse wheel zooms; right-click toggles the colour palette (Forge / Ice).
- Square slot — three cyclable 3-D visualisers (left-click to cycle): Phase Cloud (a stereo phase cloud), Terrain (a “Joy Division” spectral landscape) and Galaxy (an FFT spiral). Wheel zooms per mode; right-click toggles the palette.
10. FX
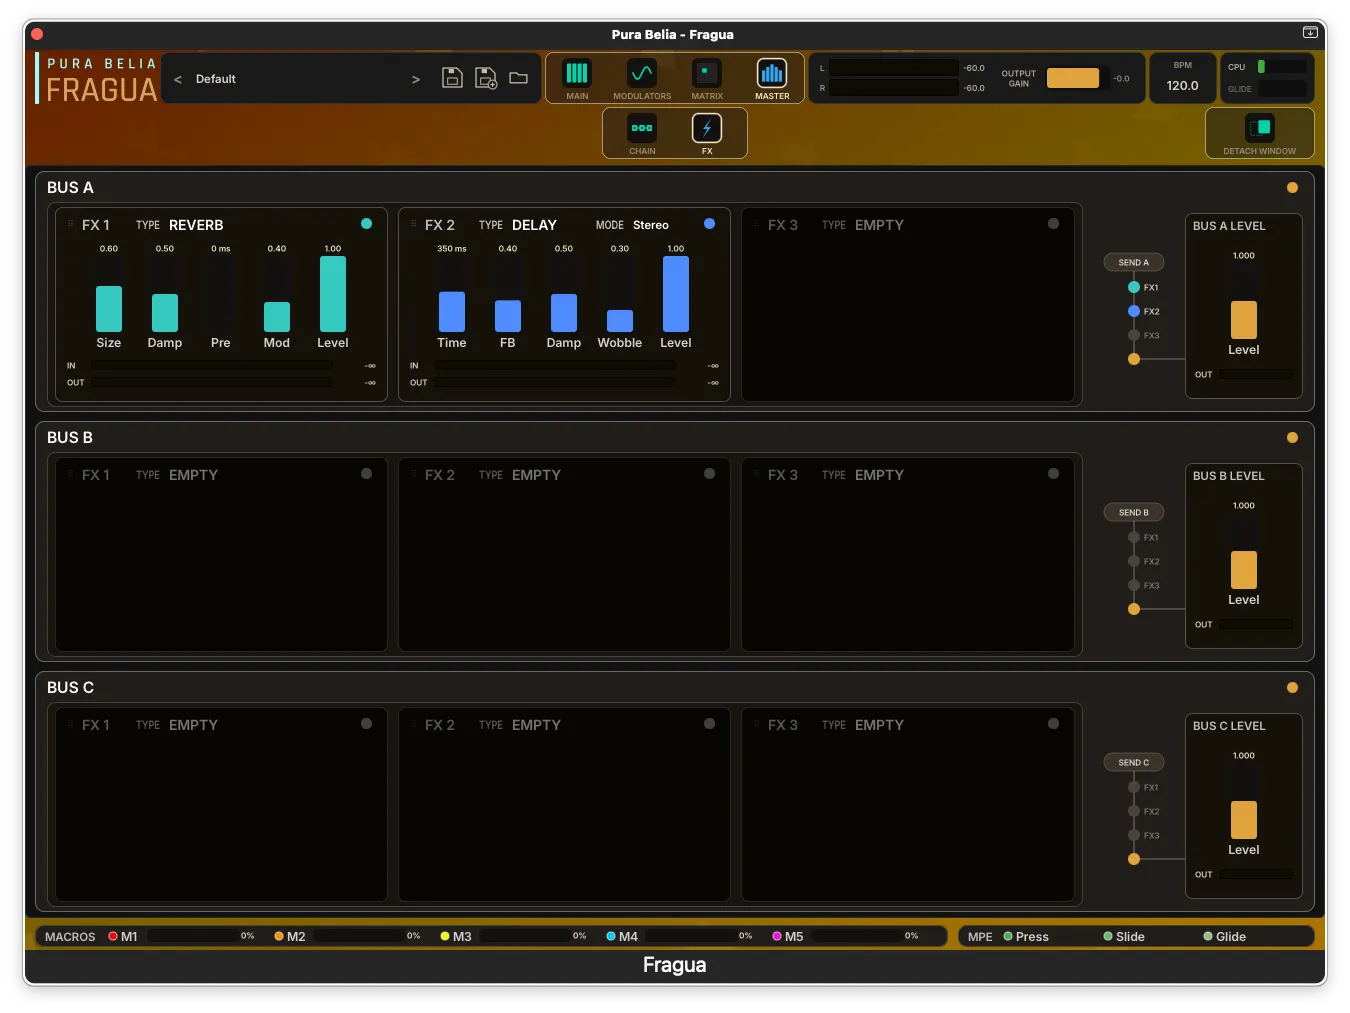
The FX sub-tab (under MASTER) is a send/return rack with three buses — A, B and C — each holding three FX slots in series (FX 1 → FX 2 → FX 3) and a BUS LEVEL return. Lanes feed the buses through their Fx1 / Fx2 / Fx3 sends (§5.10); the returns are summed back in before the master chain, so your effects are mastered along with everything else. With every send at 0 (the default) the rack is silent.
Using a slot
- TYPE — choose the effect: Empty · Reverb · Delay · Freq Shift · Granular · Howl · Ring Mod. Empty is a clean pass-through.
- Each slot has an on/off dot and up to five parameter faders that re-label themselves for the chosen effect.
- Drag to reorder — drag a slot’s “FX n” header to change the order of the chain within the bus. The reorder is visual only; the slots keep their settings.
- IN / OUT meters under each slot show level through the effect; the bus shows its return level under the BUS LEVEL fader.
The effects
- Reverb — Size · Damp · Pre (pre-delay) · Mod (modulation, to avoid metallic tails) · Level.
- Delay — Time · FB (feedback) · Damp · Wobble (tape-style wow/flutter) · Level, plus a MODE of Stereo or Ping-Pong.
- Freq Shift — a frequency shifter (inharmonic, metallic/alien): Shift (±Hz) · FB · Level.
- Granular — a granular cloud: Size · Density · Scatter · Pitch · Level, plus a FREEZE toggle (Live captures continuously; Freeze holds the buffer for sustained textures).
- Howl — a resonant, self-oscillating feedback voice (no-input-mixer flavour): Freq · FB · Damp · Drive · Level.
- Ring Mod — classic ring modulation: Freq · Level.
Bus level & sends
BUS LEVEL sets how much of the processed (100% wet) return comes back into the mix. The amount each lane sends to A/B/C lives on the lane’s Fx1/Fx2/Fx3 controls on the MAIN page — so you dial the effect on the FX page and the send amount per lane on MAIN.
11. Presets
The preset bar
In the top bar, the preset name sits between the ‹ › step arrows. Click the name to open a category dropdown (Factory and User, with a tick on the current one); the arrows step through every preset. Three icons follow:
- Save (floppy) — overwrites the current user preset silently. If the current preset is Factory or none, it opens Save As instead.
- Save As (floppy +) — saves a new preset; you can set its name, category and info.
- Browse (folder) — opens the full browser.
The browser
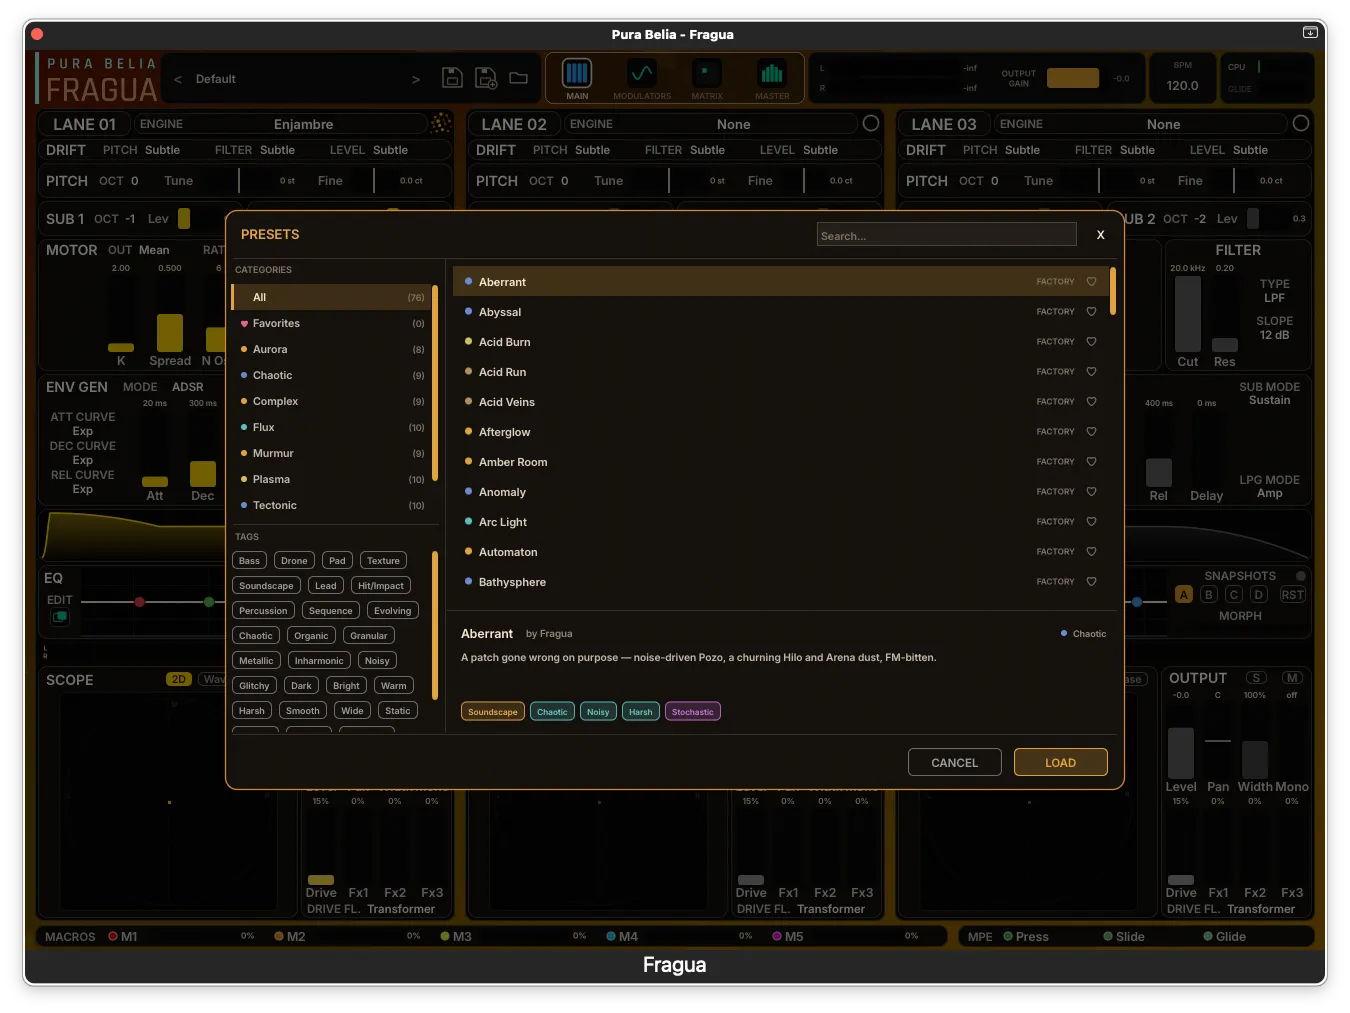
A modal browser with a sidebar, a list and an info panel:
- Sidebar — All, Favorites, and the categories (each with a colour dot and a count). Below them, a TAGS section of toggle chips, grouped by facet (Type · Character · Motion). Selecting tags filters the list with AND (a preset must carry all the chosen tags).
- Search — searches names, authors, descriptions and tags.
- List — each row shows the preset, a FACTORY badge where applicable, and a heart to favourite it (click the heart to toggle without loading; double-click the row to load).
- Info panel — author, description and tags for the selected preset.
- Right-click (User presets only) — Edit Info, Rename or Delete. Factory presets are read-only.
Saving
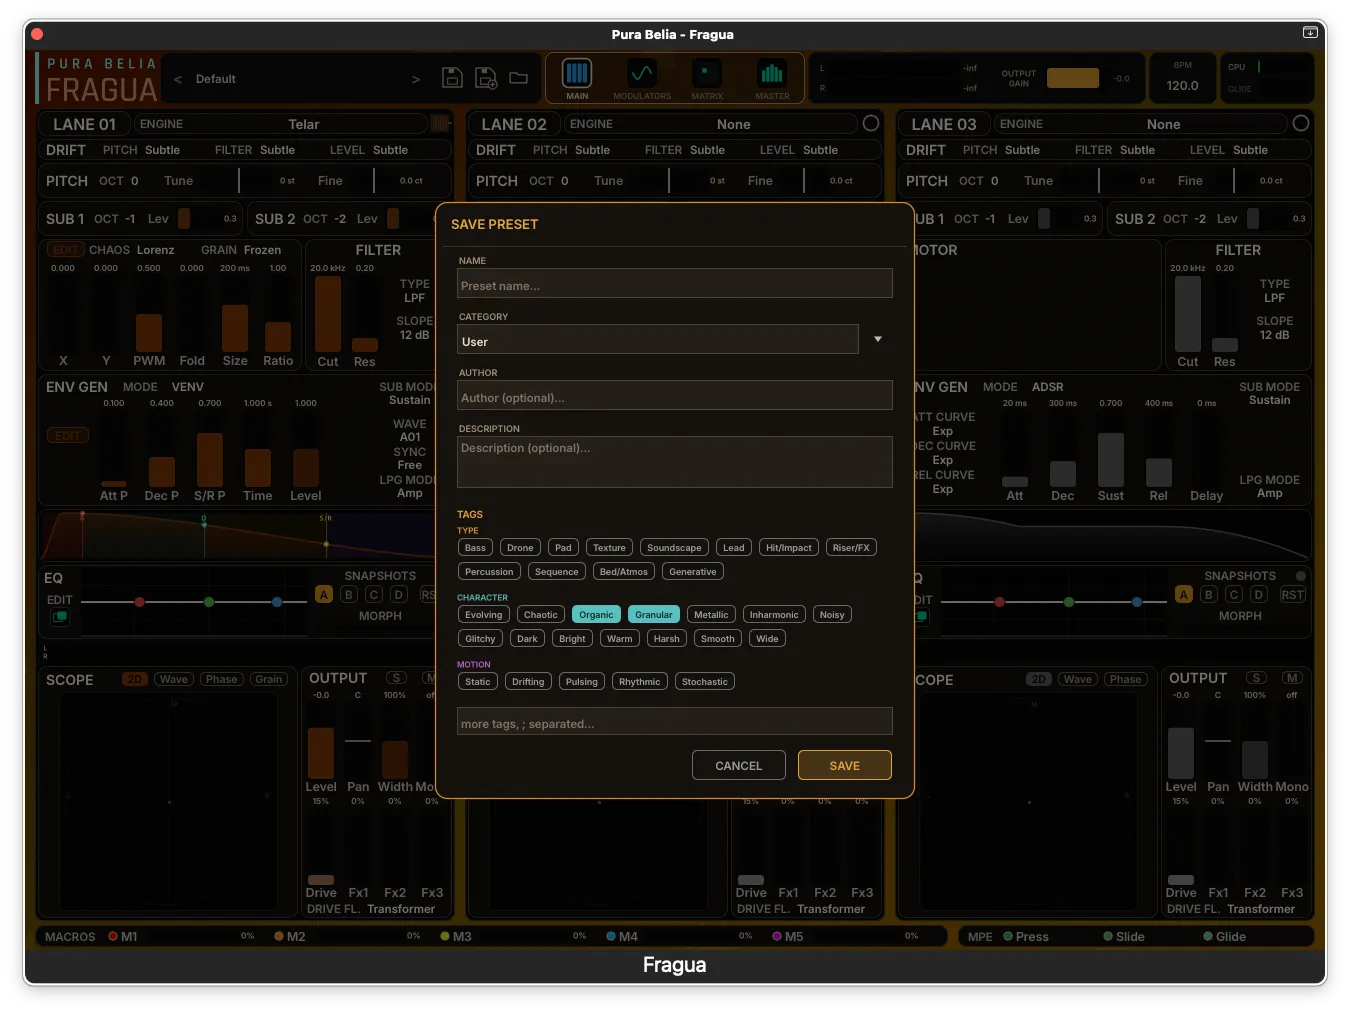
Save As opens a dialog with Name, Category (with a dropdown of existing categories), Author, Description and Tags (the curated Type/Character/Motion chips, plus a free field for your own, separated by ;). When you save a brand-new preset with no tags, Fragua auto-suggests Character tags based on the active engines — you can adjust them.
Where presets live
Presets are XML files with the .fragua extension, stored in ~/Documents/Fragua Presets, split into Factory and User folders by category. You can back this folder up or move it between machines; favourites travel with it.
Reset. The name dropdown includes Reset to Default, and Settings → Presets has Open Presets Folder and Reset to INIT.
VENV shape sub-bank
The VENV vector-envelope shapes have their own small bank (the .fragvenv files, organised in banks A–J). You manage them right from the Save / Save As / Browse actions in a VENV’s wave dropdown (§7.2), so a shape you draw on one envelope can be reused anywhere.
12. Settings
The Settings panel (the gear in the top bar) is an accordion of rows — click a row to expand it. Some settings are global (they belong to the app and persist across sessions, independent of presets); others are per-patch (saved with the preset).
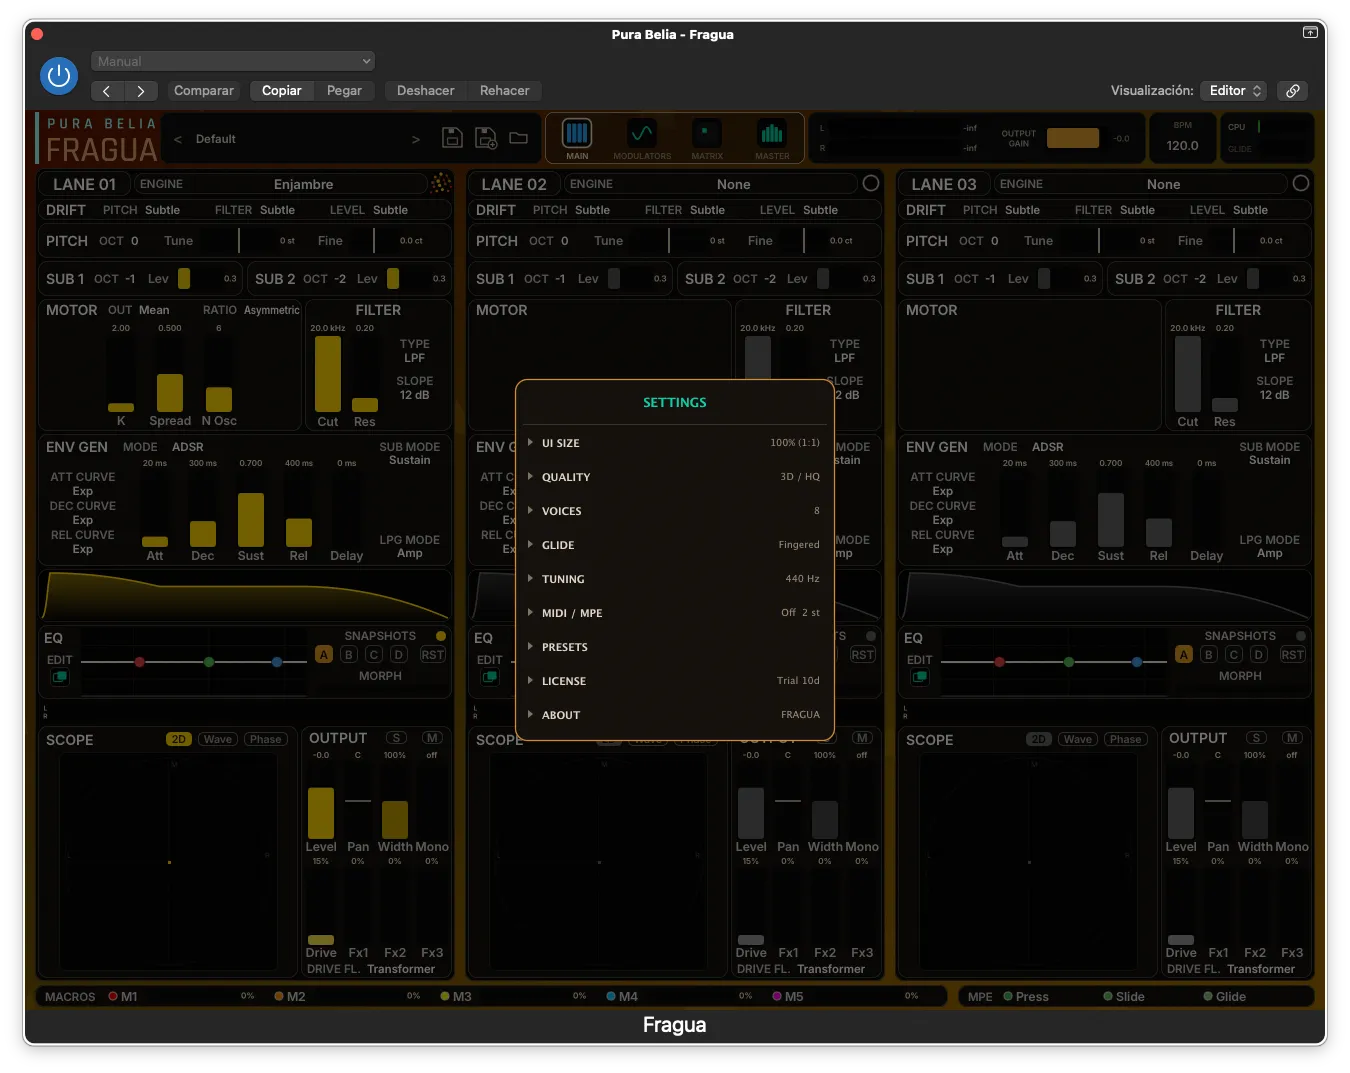
- UI SIZE (global) — interface scale, from 75% to 200% (100% = 1:1). Resizes the editor window; changes apply immediately.
- INTERFACE (global) — how the interface behaves, as opposed to how big it is. Both settings apply instantly, reach the detached windows too, and are yours, not the patch’s: they don’t travel in presets, so you choose once and it holds for every project.
- Scroll wheel — what the mouse wheel does when the pointer is over a fader.
- Fine (default) moves one parameter step per event — the smallest change that parameter can express. On a trackpad or a Magic Mouse it also stops the instant you lift your fingers, so a flick doesn’t keep drifting the value.
- Coarse is the large, classic jump.
- Off doesn’t remove a feature — it gives the wheel back to the window: scrolling over a fader scrolls the page, as it does everywhere else, instead of changing the value.
- Background — Ember (default, the amber forge) or Slate, a neutral charcoal. Only the backdrop changes: same controls, same per-engine colours, same sound.
- Scroll wheel — what the mouse wheel does when the pointer is over a fader.
- QUALITY (global) — two independent switches:
- OpenGL 3D — the master’s 3-D visualisers. Turn off on older machines to save the GPU (no effect on audio).
- Engine HQ — internal 2× oversampling for the engines. In practice this matters most for Crisol (the one engine that aliases measurably). On by default; costs some CPU.
- VOICES (per-patch) — polyphony: 1 · 4 · 8 · 16 · 32 · 64 voices (default 16; more = more CPU), plus a Legato switch (held/overlapping notes don’t re-trigger the envelope).
- GLIDE (per-patch) — portamento mode: Fingered (glide only between overlapping notes) or Always. The glide time is the GLIDE control in the top bar.
- TUNING (per-patch) — master reference A = 415…466 Hz (default 440). Use it for historical or alternative tunings, or to match acoustic instruments.
- MIDI / MPE (per-patch) — three groups. Under MPE, the mode: Off / Lower / Upper. Under Pitch bend, the Global range (0–24 semitones, default 2) and — in MPE only — the Per note range (default 48 semitones). Under MIDI channels, Lane 1 / 2 / 3 Ch sets the MIDI channel each lane listens to: Omni (the default — the lane takes every note, exactly as Fragua has always worked) or a single channel 1–16.
- What it’s for. With one lane per channel, a single instance of Fragua can be played as three instruments at once — one sequencer track (or one part of a multi-channel generator) per lane, in one plugin, sharing one master chain.
- A note is still one voice, whichever lanes it reaches. Three channels playing at once therefore allocate roughly three times the voices — each rendering a single lane, so the CPU per voice drops, but the voice count doesn’t. If notes start dropping, raise VOICES.
- Not available with MPE. MPE spreads channels 2–16 across notes, so a lane pinned to one channel would only sound part of the time. With MPE on, the selectors disappear and every lane goes back to Omni.
- Two behaviours change while any lane filters by channel: in mono (VOICES = 1), releasing a note no longer returns to the note you’re still holding — the held-key stack doesn’t know which channel each key came from, and returning would wake lanes that aren’t listening. And glide, legato and mono priority stay global: they see one stream of notes, not three, so a portamento can tie a note on one channel to the next note on another. For per-channel parts, keep GLIDE at 0.
- PRESETS — Open Presets Folder (reveals
~/Documents/Fragua Presets) and Reset to INIT (back to the initial patch; asks for confirmation). - LICENSE (global) — your license status. While in trial it shows the days left and an Activate license… action (opens the activation overlay); once registered it shows your email and a Deactivate action to free the activation for another machine. See §2.
- ABOUT — version and credits (Pura Belia), plus Open Manual, which opens this manual’s PDF in your system’s language (English or Spanish).
13. Appendix
Keyboard & mouse shortcuts
| Shortcut | Action |
|---|---|
| ⌘Z / Ctrl+Z | Undo |
| ⇧⌘Z / Ctrl+Shift+Z | Redo |
| Esc | Close the open overlay or dialog |
| Enter | Confirm a dialog (load preset, save) |
| Right-click a fader/knob | Modulation menu — Modulate with…, Send to Macro, and remove existing connections |
| ⇧ Shift + drag a fader/knob | Fine adjustment — the drag becomes ~20× finer, for sweeping a parameter slowly and hearing every step. Clicking a fader never jumps it to the pointer: the adjustment always starts from the current value |
| Double-click a value | Type a value in directly |
| Double-click the rail of TUNE, SUB Lev or an FX send | Reset it to its default (sends go back to exactly 0) |
VENV shape editor
- Drag a breakpoint to move it; double-click an empty spot to add one; right-click a point for its menu.
- Hold Alt to snap to the grid.
- The mouse wheel zooms horizontally around the cursor; hold Shift and drag to pan; zoom fully out for the whole shape.
EQ display (lane & master)
- Drag the coloured nodes to set frequency and gain.
- The mouse wheel on an HPF/LPF node sets its Q.
Master 3-D views
- Left-click cycles (camera angle on the spectrum; visualiser on the square slot).
- The mouse wheel zooms; right-click toggles the colour palette (Forge / Ice).
Undo/redo covers the patch — parameters, routings and drawn shapes. Camera angles, zoom and scope modes are global UI preferences and are intentionally outside undo.
Credits
Fragua — a polyphonic chaos synthesizer by Pura Belia.
Built with JUCE. Licensed through Lemon Squeezy. © Pura Belia.
Support: info@purabelia.com · purabelia.com
Fragua — Pura Belia.